
I've been so excited to do this project! We had just went to the pumpkin patch in the early part of the week and I could just barely wait to paint those pumpkins :) I headed to Hobby Lobby to pick up my supplies for this project. I opted for a pearl finish, metallic silver, antique gold and midnight blue craft paints. These were 30% off at the time (making them about $1.15 each). I also grabbed a cute stencil in the same isle for $2.99 ( I will use this for lots of other projects!) I browsed the ribbon for something that really stood out to me. I didn't find the exact color I was looking for, so I went with this navy blue and white design that will go well with my paint colors ( originally $3.99 but I used a 40% off coupon, making it $2.42).
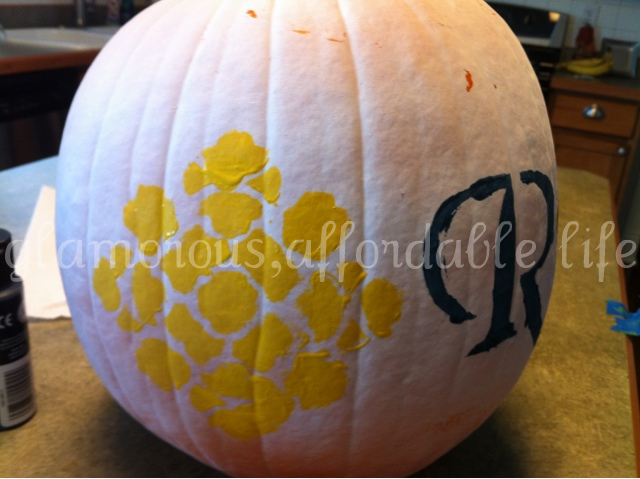
Once I was back home, I grabbed a painters tarp and my two large pumpkins and headed to the deck. I sprayed these with a cheap, white spray paint I bought at Walmart previously for $.97. While those were drying, I grabbed a few paper towels and small tupperware lids and got to work. I like to use the tupperware lids for my paint because they wipe clean really easy and you can re-use them over and over! I started my first pumpkin with the chevron design. I used about a 1.5 inch piece of painters tape cut in half to arrange the design. The first color I used was the metallic silver, and I brushed it over the entire top of the pumpkin including the stem. I did the top of my small pumpkin with the silver as well. Once the silver was (somewhat) dry, I painted the bottoms with midnight blue. I grabbed one of my large pumpkins I sprayed white and tapped a stencil "R" in the middle. Let me tell ya, stenciling a pumpkin was a little bit of a booger! Any who, I also used the midnight blue for this; carefully remove your stencil. Feeling a bit discouraged from the previous stencil, I gave it another go and taped the designed stencil next to the "R". For this, I used the antique gold paint and carefully filled in the entire stencil, removed and did it to the other side.
I was so anxious to see how my chevron pumpkin turned out, I started to remove the tape... It started to pull the paint off :( Oh well, it's not the end of the world and I decided to just go over it will the antique gold to blend it all together. I also painted one other medium pumpkin I had with the gold, as well as the middle of my small pumpkin. Next, I went back to my large initialed pumpkin and began to use the pearl finish as a glaze over the entire pumpkin. It gave it a beautiful glow!
I finished the pumpkins off by embellishing them with the ribbon I picked out! This project took me some time, but I'm happy with how there turned out! They aren't perfect, but I didn't expect them to be :)


Sharing this project on these lovely sites! Thanks for hosting ladies :)
Oh how cute are they. I painted some silver and gold, but nothing like yours. Theya re stunning. I adore the character you gave them all. Hugs, Marty
ReplyDeleteThank you so much Marty!!
DeleteHow fun! You did a great job! I can't wait to paint some cute little pumpkins too!! Happy Friday!
ReplyDeleteThank you Emily!! It was a lot of fun!
DeleteI always spray mine with clear gloss paint after washing. They keep longer and give a nice shine. Very cute and creative.
ReplyDeleteThey look too cute! :) Great job!
ReplyDeleteRosie xo
gorgeouslyglowingmakeup.blogspot.com
Those are really cute! Love the ribbons too!
ReplyDeleteThank you!!
DeleteHi Fotini! I wanted to reply about your sweet comments on my blog, but you are coming up as a "no-reply" blogger. You will get a lot more feed back if you fix this in your settings. You can do that by following the instruction on this link: http://cowscorncountry.blogspot.com/2012/07/are-you-no-reply-blogger.html
ReplyDeleteThank you for following and I'm following you back!
Thank you so much for letting me know Danni! I will fix this pronto!
DeleteThese are so cute! What an inviting presentation. Thank you for joining us for this week's Feed Me Friday, I'm looking forward to reading more from you.
ReplyDeleteEnjoy your weekend!
Best,
Emily
I really appreciate it Emily, thanks ;)
DeleteWow! Those look amazing!
ReplyDeleteI'm stopping by from the blog walk. I'd love for you to visit me at http://www.fashionablysaving.wordpress.com
I'll be liking you on Facebook as well.
What a chic way to decorate pumpkins!
ReplyDeleteThanks Jeannie!!
DeleteI love these!! I want to make some!
ReplyDeleteThank you :)You should give it a try!!
DeleteHi Fotini, thank you so much for coming by today, these are so cute! Following you too :)
ReplyDeletexoxo, Tanya
I'm so glad you stopped by Tanya!!
DeleteLove them! Such a great fall display.
ReplyDeleteSo sweet, thank you ;)
DeleteI think they look great, it doesn't matter at all that the paint flaked a bit
ReplyDeleteI had a great time doing them and I'm pretty happy with the end result, so I'm not mad a bit ;) Thanks for stopping by!!
Deletethis is such a cute cute idea.. omgoodness. i love it... (i'm visiting and following back finally from the funny thing of it is) sorry it took a little while. i was on phone it wasnt letting me go to gfc connect. hmmmmm.. anyways stop by for a great giveaway on my blog with one of my sponsors =)
ReplyDeleteThanks Julie for following back Julie, no worries!!
DeleteI love these!!! So cute! I love pumpkins that are kinda glam!
ReplyDeleteThey turned out so pretty! My front porch is sad, sad, sad compared to yours. Better get moving on that. ;)
ReplyDeleteThanks for visiting my blog, I thought I'd check yours out too and I'm glad I did!
Thanks so much Rachel!
DeleteYou sure fancied up those pumpkins! They are looking so pretty sitting on your porch, love the chevron!
ReplyDeleteThank you! I'm crazy about chevron, always {trying} to incorporate is some how ;)
DeleteI found your blog via link party. What a wonderful pumpkin project! Bright and really make a party
ReplyDeleteI found your blog via link party. What a wonderful pumpkin project! Bright and really make a party
ReplyDeleteLOVE the pumpkins!!! Do you want to paint a few for me???
ReplyDeleteThanks so much for sharing this at The DIY Dreamer.. From Dream To Reality!
great ideas. i'm your newest follower. come check out my blog when you have a minute at http://sister-number-5.blogspot.com
ReplyDeleteThose are adorable!! I'm loving the bows... way too flippin' cute! Thanks so much for sharing at my Throwback Thursday party, I'm so glad I found you :)
ReplyDeleteThanks so much Britni!!
DeleteAnother gorgeous creation, Fotini! Love it!
ReplyDeleteKatie
www.funhomethings.com
Thanks so much!!!
DeleteYour pumpkins are stinkin' cute! I love the look of a painted pumpkin!
ReplyDeleteThanks for linking up this week!
Stacey of Embracing Change
Thanks so much Stacey!!
DeleteAww what a cute little pumpkin patch!! Thanks for sharing it at our Keep Calm & Link Up party! Hope to see you again in a couple of days for the next one!
ReplyDeleteThank you so much Sarah, I will be there ;)
DeleteThese are so cute! I am featuring them tomorrow! Thanks for linking up!
ReplyDeleteKim~madeinaday
Eek!! I'm so excited, thank you!!
DeleteLove love love your ideas and creativity!! SO awesome!!
ReplyDeleteHave a great weekend!
Meegan
meeganmakes{dot}com
I'm so glad you stopped by!!
Delete