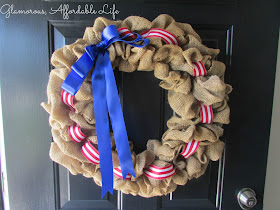
First I'll show you how my burlap bubble wreath makeover went! The technique I used to update it was quite simple. I bought red and white striped ribbon, as well as, a beautiful bright blue from Jo Ann Fabrics. I grabbed 2 pipe cleaners I already had at home and cut them into about 2 inch pieces. To begin, I simply tucked the end of the red and white ribbon onto my wire form, left about 3 inches of ribbon vertically and secured with pipe cleaner. I continued until completed. I wouldn't worry about fixing your burlap as you go, wait until the end to cover up the gaps, if necessary. Next, grab the blue ribbon and cut three lengths of ribbon in descending size (long, medium,small). Fold the length of the ribbon in half and tape into place. Layer the ribbon on top of eachother (again long, medium and small) and use floral wire to tighten the center. Grab a long piece from your extra blue ribbon and tie it into the middle of your bow, fishtail the ends, poke a small piece of floral wire to the back for attaching to the wreath, and voila!
I love how it turned out, it really makes our new black door POP!
And so now we're onto the project I was pretty excited about sharing! I wanted to make my own garden flag for the stake in front of my house. While I was at Jo Ann's picking up the ribbon for my wreath, I browsed the burlap (because everyone does that every time they're at the craft store, right?!) and the silver polka-dotted burlap just had to come home with me! I got a half a yard, but that was more than enough. Once home, I grabbed a flag I already had to measure the size. I left about and inch on each side, as well as, the bottom. I left a good two inches on top since this would be the part that would be sliding onto the garden stake. With my sewing machine, I sewed the sides and bottom. I looped the top piece over and sewed the edge, make sure to leave that middle space open!! I took remaining ribbon from my wreath update, cut them at different lengths and sewed them together, then sewing them onto the middle of my burlap. For the finishing touch I fishtailed the ends of the ribbon!
I was quite happy with how it turned out and it looks beautiful blowing in the wind J
Sharing this project on these lovely blogs!


Both of these look amazing! I love how you redid the burlap wreath.
ReplyDeleteThank you so much Shannah <3
DeleteVery original. I'm visiting from Made in a Day. Come join our party, too. Following you on Pinterest and Facebook. Linda
ReplyDeletehttp://www.craftsalamode.com/2013/06/what-to-do-weekends-25.html
So cute! I love the red and blue against the burlap! Thanks for linking up to Give Me the Goods Monday! Love having you party with us! Jenna @ Rain on a Tin Roof
ReplyDeleteThank you so much Linda <3
DeleteBoth projects are GREAT!!!
ReplyDeleteThanks so much for sharing this at The DIY Dreamer... From Dream To Reality!
Thanks for stopping by and checking them out Christine! Enjoy your weekend!
DeleteFound your blog from Liz Marie's linkup...I LOVE that flag! The burlap, the polka dots, the red white & blue, I love it all!! :)
ReplyDeleteThanks so much Jenna!! I'm so glad you stopped by :)
DeleteI love both of these! I can't wait to try making my own flag, I never thought to make one :)
ReplyDeleteThank you Katy! I can't wait to make another! You really can't go wrong with the simplicity of this project :) Have a great week!
DeleteI love everything burlap! And I love the simple tip of using a pipe cleaner. I feel that was an AHA moment for me :)
ReplyDeleteI hope you come and link up with us today at our Monday link up party!
http://www.sowderingabout.com/2013/07/on-display-link-up-8.html
Awesome Randi, I'm so glad to hear you find that helpful!! Thanks so much for stopping by!
DeleteStopping by to let you know I featured your flag today on Made in a Day!! Have a great 4th!
ReplyDeleteKim
Super excited thanks Kim!!
DeleteLove your wreath! Thank you so much for linking up to my linky party. Hope to see more from you next time.
ReplyDeleteThank you Rita!
Delete